|
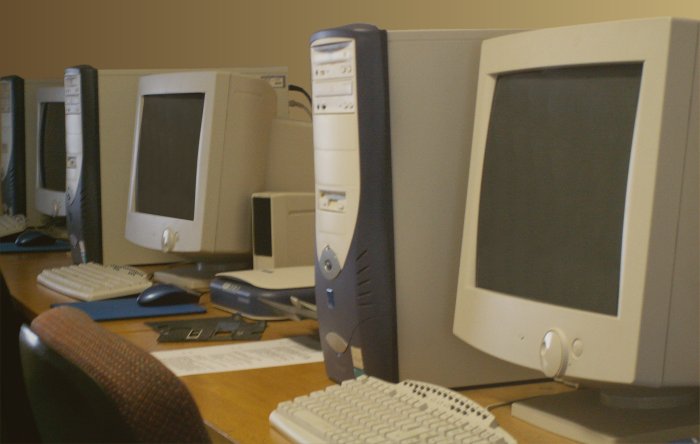
[July 2023] Back in the early
2000s (the picture above is from
2004) I was responsible for
maintaining computers at a small
"cyber cafe" of sorts. While I
was there the computers got
upgraded from one sort of beige
box to the systems you see
above, all dual-booting both
Windows 98se and XP because we
needed to cater for people using
either of these operating
systems at the time.
The PC cases were manufactured
by a company called Tsunami (the
heading at the top of the page
is from their website as found
using the Wayback Machine), and
these were of the "Virgo" model
(hence the name for this
project). They were pretty cheap
with flimsy power buttons and
flaps covering the front USB
ports, but they looked smart all
being the same. Originally they
included Tsunami-branded
keyboards, mice and speakers,
but gradually these cheap
accessories failed one by one
and were replaced by more
reliable ones.
When the internet place where I
worked closed down I was offered
some of the systems, by which
point they had been upgraded (by
me) to Windows 7.
To this day I still have a few
of these cases, and although the
original innards gradually
got lost to the sands of time,
the cases were re-purposed to
house systems taking part in
SETI@home. Now though, I've
stepped back from such
shenanigans and, for this page's
case in point (no pun
intended), I have refitted one
of the cases with a more
"period-correct" system using
parts I have gradually acquired.
-
 Asus
A7V333 Socket A Motherboard Asus
A7V333 Socket A Motherboard
- AMD Athlon XP 2200+ CPU
- AeroCool CPU Cooler
- 512MB DDR 333 RAM
- Nvidia FX5200 128MB AGP Graphics Card
- 80GB IDE Hard Drive
- DVD-ROM IDE Drive
- CD-RW IDE Drive
- Floppy Drive
- C-Media 5.1 Sound Card
- PCI USB 2.0 & Firewire Card
- Hauppauge TV Card
The Asus A7V333 Motherboard...

This
board had a couple of issues and
limitations.
Firstly, one of the CPU cooler
mounting "lugs" on the CPU
bracket had snapped off, meaning
that using a typical cooler that
hooks onto a single lug on
either side is no longer
possible.
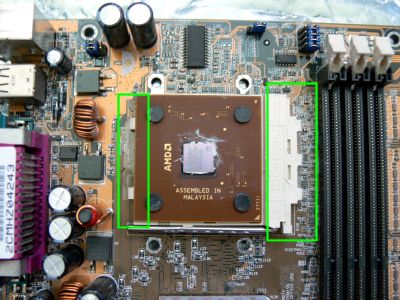
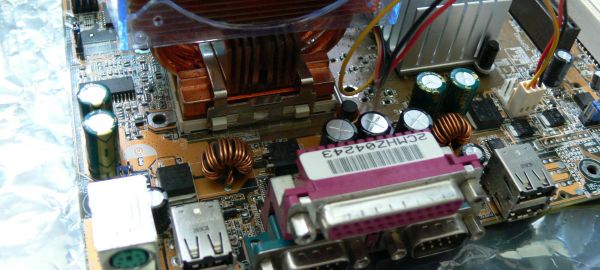
A
bit of hunting around online
landed me with the snazzy
AeroCool heatsink which could
hook onto all of the remaining
lugs (see image below). It's
actually missing a couple of fan
screws, but it's ok for now. The
board itself actually has 4 x
mounting holes for a suitable
CPU cooler, so that could be a
further option.
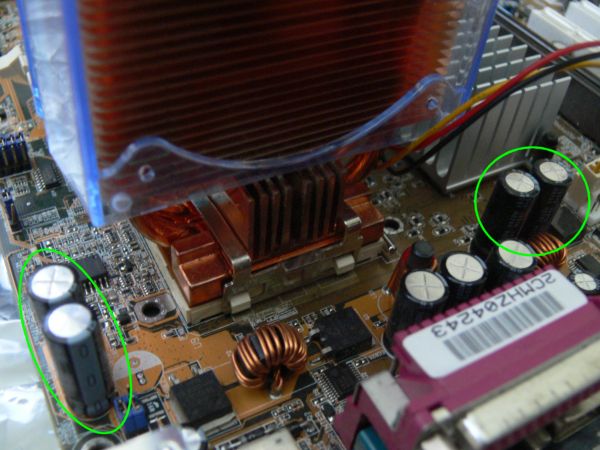
The
next issue was that the system
would struggle to startup from
cold; it would get into Windows
but then do a hard crash or
lockup. After two or three
reboots things would settle down
and it would stay on. I could
see that a few of the
motherboard's capacitors looked
problematic so I set about
replacing these (I'm pretty sure
I had ruled out a possible PSU
issue at this point).
I've
become pretty proficient at
replacing capacitors; my process
is as follows:
-
With
the board removed from the case
I remove the RAM, CPU and CMOS
battery from the board.
-
I
make a note of the orientation
(and type) of the capacitors to
be replaced.
-
I
gently pull off each of the
capacitors to be replaced with a
pair of long-nose pliers, giving
a back-and-forth twisting motion
as I gently pull. The idea is to
leave the capacitor's legs
behind in the board. On this
occasion a couple of the legs
actually snapped off short at
the board, not ideal but it was
ok.
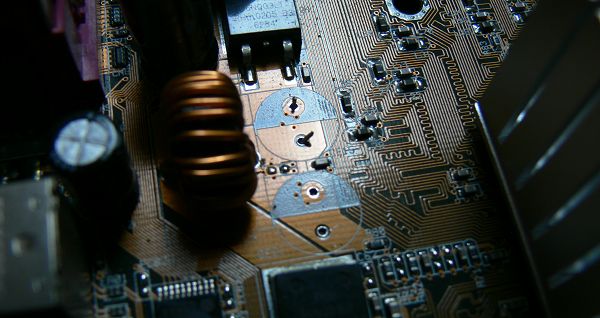
Two
blank spots where capacitors
once stood. Some legs remain.
-
I
add some flux to each of the
remaining bits of leg on each
side of the board.
-
I
tin the heated soldering iron.
-
I
grip the leg on the top side of
the board with the pliers and
apply gentle pulling pressure
while I hold the iron
 to
the nub of the leg on the back
of the board. Each leg pulled
smoothly out in turn. For the
couple that had broken short I
used a drawing pin/thumb tack
with plastic cap to push the leg
through the board while applying
the heat to the nub on the back. to
the nub of the leg on the back
of the board. Each leg pulled
smoothly out in turn. For the
couple that had broken short I
used a drawing pin/thumb tack
with plastic cap to push the leg
through the board while applying
the heat to the nub on the back.
-
I
cleaned off the flux from the
top of the board with
isopropanol.
-
I
then prepared the replacement
capacitors by snipping their
legs short (approx. 4mm).
-
I
applied a blob of flux to the
holes on the back of the board.
-
Taking a capacitor and lining it
up with the holes and applying
gentle finger pressure, I put
the tip of the tinned soldering
iron to each of the two holes in
turn; the flux sizzles and the
short legs sink through, my
gentle finger pressure seating
the capacitor's base flat. I
check each protruding leg is
sufficiently soldered and
trimmed short where necessary.
-
Clean the flux off the back of
the board with isopropanol.
With
this process I don't have any
unnecessary difficulty in
de-soldering the old capacitors
from the board and potentially
causing damage. The board's
holes being blocked with solder
are generally not an issue this
way; cutting the replacement
capacitor's legs to length first
means the legs can be pushed
through while applying heat
without long legs bending.
With
the board's 4 x 3300uF 6.5V
capacitors replaced I
reassembled everything.
I
then tested the system to find
that it's now stable - success!
The board also has a few 1500uf
6.5V capacitors of the same
dubious type although visually
these all looked fine so I left
them alone on this occasion.
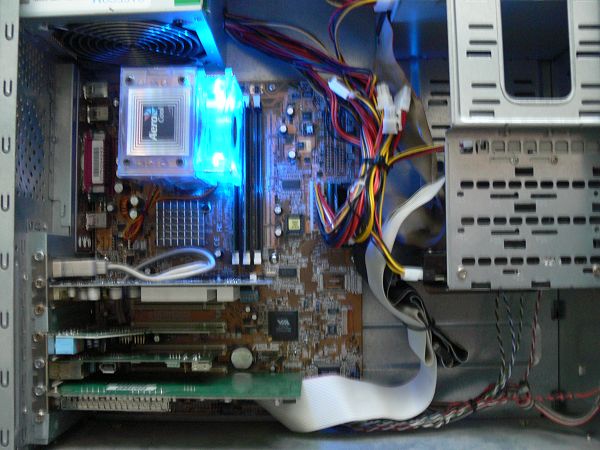
A
blurry shot of everything
reassembled.
Further notes:
I
have Windows XP installed on the
system. The Asus A7V333
Motherboard is a full-size ATX
so it fills the case nicely
(originally these cases had
micro-ATX boards in them so they
looked pretty empty back then).
This motherboard lacks onboard
sound, hence the addition of the
sound card. The AGP slot is only
4X rather than 8X, but I'm not
interested in gaming. The
Hauppauge TV Card is something
I've owned since new, from my
Windows 98 days, not that I
watch TV per-se, but it can tune
into FM radio too. There's
something satisfying about
filling as many slots as
possible...
[Back
to Top]
|