|
 [November
2024] Last year I acquired a Mac
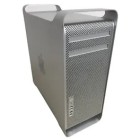
Pro 2006 (A1186). It was seemingly in
full working order besides a
couple of minor issues/gripes
(the case had some minor damage
seemingly from being placed down
too heavily, and the one
remaining optical drive couldn't
get past the failing to retract
door). [November
2024] Last year I acquired a Mac
Pro 2006 (A1186). It was seemingly in
full working order besides a
couple of minor issues/gripes
(the case had some minor damage
seemingly from being placed down
too heavily, and the one
remaining optical drive couldn't
get past the failing to retract
door).
The
system was not only supplied to
me with a whopping 32GB of RAM
but a full compliment of hard
drives (4) (4TB in total), but I
elected to sell those drives off
and I cloned the main system
drive to an SSD*. Ultimately
though, I wanted to install a
variant of Linux of this
system**, and have Einstein@home
running on the dual Xeon CPUs.
I
failed to get the Mac to boot
from my USB drive so I swapped
in an SSD that I had previously
installed Ubuntu on in another
computer. The Nvidia GeForce
7300 GT didn't like the desktop
environment though and appeared
glitchy so I proceeded to
download and install a couple of
others to try. During the
process however the system
abruptly crashed and then would
no longer start up or chime.
Up
until this point I had
occasionally had to reseat the
RAM trays and in doing so I
found them to be quite warm.
After much troubleshooting
however, followed by some (not
so easy) dismantling, I suspected
one of the Xeons had perhaps
failed as there was a lot of
dust built up in the heatsinks
which was not obvious from the
outset due to the rest of the
system appearing clean.
Some things I had tried:
-
Reading the DIAG_LEDS [link]:
Only Standby (Trickle Pwr) and
Power Good LEDs lit when I
pressed the button, none of the
ones relating to CPU temps, but
I'm suspecting the CPUs have
been struggling under high
temperatures for a while but
perhaps not tripping the high
temp cut-off while in my
possession.
-
Clearing the CMOS/replacing the
battery.
Dismantling:
Gaining access to the CPU
heatsinks took much effort and
head-scratching.
Firstly, there are two
noticeable variants:
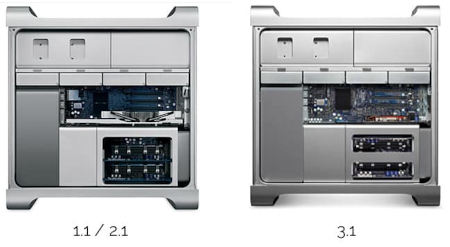
Mine
is the left, notice the
different RAM bays (lower-right)
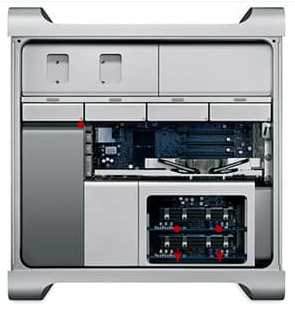
Secondly, take note of the 5
labelled screws in the image
below, the lower four to be
removed after removing the RAM
trays (and ideally the graphics
card):
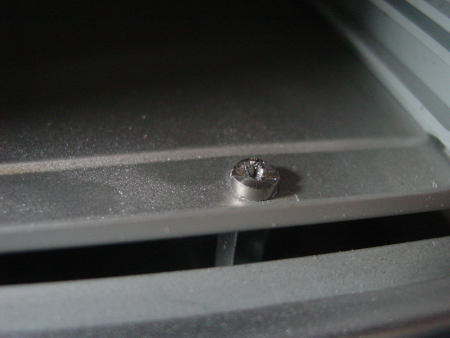
The
lowest two screws posed a
problem for me (and researching
online indicated I'm not the
first to encounter this); the
screws had been installed with
thread lock and thus the heads
stripped out when I tried to
remove them. To overcome this I
used my not-a-Dremel tool to cut
slots into the heads, being
careful to vacuum up any metal
particles). I was then able to
use a slotted screwdriver to
remove the screws (the standoffs
below might come out with them).
It took care and patience.
With
the screws removed and the three
shrouds loose, the left most one
housing the front fan can be
tugged out (it takes some force
so just make sure you have
removed that single screw
holding it down. If you just
wanted to gain access to the
front fan and to clean the dust
built up at the front of the CPU
heatsinks (highly
recommended***) you could
probably get away with only
removing that one screw and
tugging out the housing.
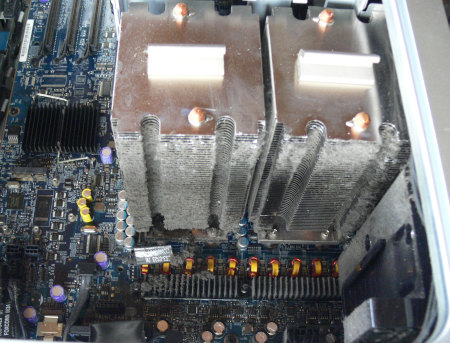
If
you want/need to remove the CPU
heatsink towers then you will
need to tug off the cover of
those. A long (20cm) hex/torx
driver will be required to reach
in to the 8 screws. Technically
a 3mm(?) hex driver is required
but T15 (torx) drivers of the
necessary length appear to be
more available/cheaper and can
do the job.
There is temperature probe
attached to the base of each
heatsink so be sure to unplug
those from the mainboard before
lifting out the heatsinks. Also
make note of which heatsink is
which as there are rubber pads
on certain sides.
I
tried a few other things at the
stage to try and coax some more
life out of my system while I
awaited delivery of a pair of replacement
CPUs, but with no luck.
I'm
was suspecting (hoping) I had a
dead Xeon (rather than some
other fault I am not able to
pinpoint or fix). Since mine are
only dual-core 2.0GHz variants I
would have liked to take this
opportunity to swap these with a
pair of quad-core ones. They
need to be LGA 771 versions and
according to ChatGPT there are
only a few CPUs that are drop-in
replacements. Since there were
limited options, I went with the
cheapest and thus lowest spec I
could find, a pair of Quad Core
E5320 @ 1.86GHz.
I
swapped these in and reinstalled
the now dust-free heatsink
towers and powered on... the
system chimed! Yay.
However... I then powered down
the system, connected my SSD and
switched it back on... and... no
chime. The fans went into "panic
mode" and that was it, once
again I couldn't get the system
to start up.
So what had gone wrong, or what
had I done wrong? Ideas:
- There is some other fault and
that it worked once was just a hiccup (I hadn't tried the system
immediately prior to putting the replacement CPUs in.
- I didn't renew the thermal paste
for this brief period of testing; did the replacement CPUs
immediately fail because of this? (this seems unlikely)
Options:
- Give up and sell the system on
as spares or repairs
- There are some replacement
mainboard & CPU bundles, but what if my system's PSU is the
issue and causing CPUs to fail? The system isn't really worth
spending more money on but I don't like the "what if?"
Other stuff:
*In
order to properly mount my SSD
in the original caddy/sled I
will need a suitable 3.5" to
2.5" bracket that positions the
SATA sockets in the same place
as on a hard drive.
**I'm still
wondering how I might boot the
system from a USB drive... Which
Linux distro should then use? I
prefer to keep the desktop
environment as Mac-esque as
possible.
According to ChatGPT (which has
helped me with CPU options),
this Mac is equipped with a PSU
rated at 980W - I'm hoping this
is accurate and I can perhaps
tap into this to provide power
for a more modern graphics card.
***ChatGPT
also told me that my current
CPUs have a TDP of 65W each. If
I've had one fail due to the
build up of dust discovered in
the heatisinks, this doesn't
actually bode well for a pair of
quad-cores which would have a
TDP of 80-120W each and thus a
greater heat output... I'll just
have to periodically check those
heatsinks!
|