|
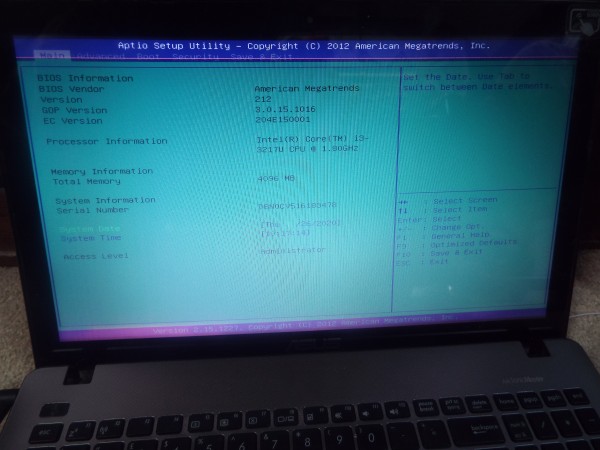
[27 November 2020] I had an Asus
550C Touchscreen with faulty
screen to fix:

Notice the purple bands running
along the top and bottom
|
Disclaimer: This is the procedure I undertook to
repair this faulty laptop. If you don't know what you're
doing then don't do it! Attempting any of this could cause
more damage or a more costly repair. |
I
wasn't certain if it was a cable
fault or a screen issue; I
looked online for examples but
it still wasn't conclusive in
this case. I opened and closed
the lid to see if the movement
of the cable would affect the
image but it didn't.
I
tried a replacement cable first,
since that would be the easiest
and cheapest part to replace,
but it turned out to be the
screen at fault.
|
|
The tools
I used:
- A screwdriver
- A pry tool
- A heatgun
- Superglue
|
|
The
procedure required dismantling
the laptop in a typical fashion
in order to remove the screen
section.
It
may be possible to replace the
screen without unfixing it from
the base of the laptop, however,
there are three screws
along the bottom edge of the
screen, hidden under little
square adhesive covers and it is
unlikely that these are
accessible with the screen
tilted as far back as it will
go. With the screen attached,
the rest of the procedure would
be likely more challenging.
 The
base section is held together
with various screws but is also
clipped together, so a pry
tool is required. Delicate
ribbon cables are in place for
the power button, keyboard and
mouse, so care needs to be taken
when removing the keyboard layer
and these cables. With
that out of the way,
replacing the screen cable
required removing the screen
section (held in with screws to
each of the hinges) and with the
base section disassembled the
motherboard also needed removing
since, while the screen socket
is on the top of it, the cable
folds round the edge and under
the motherboard. The
base section is held together
with various screws but is also
clipped together, so a pry
tool is required. Delicate
ribbon cables are in place for
the power button, keyboard and
mouse, so care needs to be taken
when removing the keyboard layer
and these cables. With
that out of the way,
replacing the screen cable
required removing the screen
section (held in with screws to
each of the hinges) and with the
base section disassembled the
motherboard also needed removing
since, while the screen socket
is on the top of it, the cable
folds round the edge and under
the motherboard.
With
the three screws removed from
the bottom edge of the screen it
is necessary to use a pry
tool to work round the outer
edge of the screen to carefully
unclip it*.
The
screen and webcam modules were
carefully unplugged and the
screen's cable carefully peeled
off the back of the screen.
Since this is a touchscreen
model a digitizer forms
the outer screen with the actual
screen is a layer beneath and
held in with an adhesive strip
running round the perimeter. I
cleared my work area in
preparation and then with access
now to the back of the screen,
and the screen placed face down
on a soft surface, I used a
heatgun to slowly warm up
the back of the screen, working
my way around the perimeter
until the adhesive was softened
just enough to pull the screen
away from its housing. This is a
similar technique employed when
disassembling an iPad or other
tablets or smartphones.
I
had the replacement screen ready
to one side and as soon as I was
ready I pulled the old screen
away and placed that to one
side, and then I removed the
protective film from the new
screen and immediately (and
carefully) lowered it into
place, being sure to get the
corners and "guide-pins/holes"
lining up as it met with the
original adhesive.
I
was keen to get the replacement
screen into place carefully and
swiftly (holding only the very
edges) to minimise the risk of
anything contaminating the new
screen or back of the digitizer
since once back together any
specs of dust (or fingerprints!)
would be noticable and trapped.
I also took advantage of the
original adhesive tape still
being warm and tacky enough to
hold the new screen; I applied
gentle pressure around the
perimeter to ensure it was
sticking and then carefully
placed some large books on the
back of the screen and left them
there until it had all cooled
down (30 minutes).
*Since I had been careful to
unclip the lid plastic part of
the screen I thought I could
just line it up with the front
bevel section and clip it back
into place, and put the three
screws back in with the little
adhesive covers, but sadly it
wouldn't clip on. It seemed the
clips had been damaged or bent
preventing this. I resorted to
using superglue to fix
the plastics back together which
meant the final result wasn't
perfect in appearance but it was
functional and the screen itself
was working properly.
I
reassembled the laptop and
tested it to confirm all was
well (keyboard, mouse and power
cables etc. all functioning).
[Back
to Top]
|